Showing posts with label extension tubes. Show all posts

Wednesday, April 18, 2012

I'm a meanderthal man...

If you look up 'Meanderthal' in the urban dictionary, you'll see that it's a word that suits me well-not only that but it might be applied to this blog entry with equal merit.


From http://www.urbandictionary.com

Meandethal: An old person who walks about at an extremely slow pace. This word is a combination of 'meander' which means to walk slowly with no apparent destination, and 'neanderthal' which refers to something old, ancient or prehistoric.

Definition 2 : Conversationalist who wanders from one subject to another with no apparent point, never reaching the end of the story.


Well, definition one certainly describes how I appear at least to wander about aimlessly whilst out bug-hunting:and slow would also be apt for fear of missing anything. As for the old,ancient or prehistoric part? Well I'm no Justin Bieber that's for sure!(Thankfully.)


Definition 2 Could be useful to quantify this particular blog entry because unless my writing skills are more deft than I myself feel they are,I may well be struggling to keep on the straight and narrow.


Shall I explain?... Easy! Easy!...just "yes please" would have been sufficient.


O.K. What I'll do to placate you after suffering this much text at the start of a blog-entry is add a pretty little picture here and then go on to 'add filling to the sandwich' thereafter...


I was pleased that my photograph (above) of an Orange-Tip Butterfly was published recently in the newspaper 'Kent On Sunday' in their section 'Images Of Kent' I apologise for the quality of the photo reproduced here but it was the best I could manage from a pdf download of the newspaper page.

Why am I sharing this with you? Firstly I've taken the liberty of assuming that you'll be interested and secondly, it demonstrates nicely just how the weather has impacted on my bug-hunting of late-even the butterflies have all but disappeared for the time being.

And all this brings us back to my opening gambit of trying to pre-warn you that consequently, this entry may wander a little with no real theme other than that of a total lack of bugs and insects due to our great British climate.


What to do when the weather is against you?


Having been experimenting with image stacking and knowing that this is for the most part an indoor sport, I have spent a few afternoons with all manner of tubes, bellows, lenses and frankly, ridiculous, Heath Robinson looking contraptions trying to produce some quality images this way but mainly managing to try my patience!


This bee pictured above was one of my first efforts and is a full-frame shot that although shows promise, was not exactly what I was hoping for with either lighting or detail. My problem to some extent is that the better these stacked shots get, the more critical I become of them. I suppose though that it's better than getting complacent and thinking that it's all just a bit too easy?


Having fiddled with the lighting and changed to a different lens, I progressed to this shot of a common earwig. Once again I was reasonably pleased with the outcome but was still looking to improve my technique.


The other major consideration with photographing tiny critters in this manner is the prerequisite of a non-moving subject: by that I mean that they be deceased! Now bug-hunting is one thing, but to then add in searching out dead creatures is even by my own twisted values, verging on 'weird'. Of course there are those who are willing to kill their subject to obtain the best possible image but that rankles with me and kind of goes against the grain.


Dead creatures are as much a part of nature as are those in the land of the living of course and once you begin to look for them, are not too difficult to locate but I'm not sure it's something that'll become 'de rigueur' for this particular nature lover.


CLICK ANY PHOTO TO VIEW LARGE AND ON BLACK

On this final image I had started to get to grips with the whole process a little more and had also realised that the lack of image sharpness was probably due to vibration and not lens quality. I resolved to improve again on my set-up by making a new rail/stage and at the same time, add some extra lighting before attempting any-more focus stacked images.


I'm pleased to be able to report that I've now carried out the improvements but have yet to find the time to road-test them.


---------------------------------------


Following on from a very warm March, April has been a real let-down and spring seems to have been put on hold for now. It has just been too cold and wet for most invertebrates.There has emerged something of a pattern lately though, in that the day seems to start well with early sunshine following on from even earlier, or indeed, overnight frost-that then degenerates into a grey gloom for the rest of the day.


Perhaps in the absence of anything else an early morning meander would be an idea?
"Yes, that's what I'll do" I thought as my head hit the pillow at the end of yet another wet and bug-less day, and so it was that the very next morning at 6.30am I was out and about 'meanderthal-ling' all over the place.


Early morning Hoverfly
On some long grass beside a local pond I spotted this little hoverfly that had obviously spent the night perched here and as it was still too cold for it, it made an easy subject to photograph without fear of it flying off.


At more-or-less the same location I saw another beefly perched in the same position as the one I photographed a while ago. Perhaps I'm getting better at finding these because until this year I've not seen this behaviour at all and now I've witnessed it twice in as many weeks.
It's interesting too that once again it's one of the paler specimens.


I decided to opt for natural light only for these early morning shots:it means that there's a little less detail but set against that is the gain of a more naturalistic light and hence, hopefully, photo.

Since I ventured out to get these few shots the weather has worsened again and now even dawn photography sessions are impossible. Until things improve, there's always the image stacking to return to I suppose but what we really need is the return of spring and so if anyone has influence in such matters?

Until the next time then...


Tuesday, November 01, 2011

What exactly is macro photography?

Macro photography of insects and bugs has always been my real passion but just what does 'macro' mean?

Macrophotography is close-up photography and will by it's very nature, usually be of small subjects. In the past a macrophotograph would be one in which the size of the subject on the negative appears greater than life-size.
Nowadays it does seem to refer more to any finished photograph where the subject is larger than life-size.

The ratio of the subject on the negative (or now in the digital age the image sensor) to the subject's actual size is know as the 'reproduction ratio'.
Most modern macro lenses will typically have a reproduction rate of 1:1 that will reproduce a life-size image. My own macro lens the Canon 100mm does exactly that, however, what if you wish to go beyond life-size photography occasionally?

True macro lenses such as the Canon MP-E65mm can achieve larger than life-size images of high quality but remain very expensive to purchase.
Extending the distance between the lens and the film or sensor, by inserting either extension tubes or bellows is another equipment option. Tubes of various lengths can be stacked, decreasing lens-to-subject distance and hence increasing magnification. Adjustable bellows or extension tubes can be used in conjunction with some other techniques including reverse mounting a lens.

Ordinary lenses can be used for macrophotography by using a 'reversing ring'.
This ring attaches to the filter thread on the front of the lens and thus makes it possible to attach a lens in reverse.

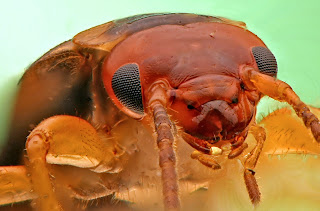
Below are a couple of photographs taken using this technique. These are full-frame, un-cropped images, just as I shot them and feature a bug that has an overall total body length of only 12-14mm.


With a standard 1:1 macro lens attached, this following photo would be about as close as you could expect to get.


My somewhat home-made kit that I took these shots with is featured below. You can see that I don't have a reversing ring to fit this lens and so I just gaffa taped the lens to the tubes. The lens I chose to reverse is not the sharpest that you will find but out of the available ones I own seemed to work the best at this experimental stage.As there is no confirmation of focusing using this method, I saw little point in using anything but cheap extension tubes. The focusing light was needed because of the difficulties of available light that I'll go into in some detail shortly.

KEY:
1. Home made flash bracket
2. Off camera cord
3. Canon 40d body
4. Extension tubes (cheapest available set from e.bay)
5. Focusing light (actually just a head-torch strapped around the tubes)
6. Carl Zeiss 50mm lens (£5 from a bootsale) Reverse mounted to the tubes (gaffa tape)
7. Flash diffuser (covered with kitchen roll to add more diffusion)
8. Canon 430ex flash unit

This was basically an experiment in reverse mounting a lens to increase magnification and so I didn't worry too much about lighting. Lighting is a whole other issue that is so important to get right and once I'm comfortable with the business of reversing, I'll tackle it in more detail to try and ensure a soft, even light without any hot-spots.


The set of photos below were taken on the same day using the same set-up.


As you can probably tell from the picture of the woodlouse, depth of field is a real issue when working so close to the subject.It shows here because of the angle I shot the photo from. The picture of the newly emerged harlequin ladybird (notice the lack of spots) is better because of the profile view where more is in focus.


To get a reasonable depth of field I needed to set the aperture to around f16; I know of folks who manage great shots at f6 but for myself I found them too soft at that. Luckily this old lens has a manual aperture ring and so it was easy to set it up before shooting began. With such a small aperture though very little light is available for focusing. To give some idea of how it works, here's a picture showing approximately the view through the f16 aperture.


As you can see it's very dark and so some kind of illumination is required to be able to focus properly. I used a small, led head torch something like the one shown below. I just used the strap to hold it to the tubes.


The photograph of the little hopper below was taken in my garden on a dull day and it was actually upside down under a leaf. It was around 5mm in length.


By adding more extension tubes to move the lens even closer to your subject the magnification can be pushed even higher. The next photo is of a tiny hopper nymph that was only about 2mm and barely visible at all until putting the camera on it.


I suspect that the weather may thwart too many more chances to experiment with this set-up but I may be able to resort to indoor pictures whilst I try and improve on these first shots and also work on some lighting adjustments.

Until the next time then...